
Thanksgiving have always been a big deal. For the last five years ever since I moved back from college, I have always spent Thanksgiving dinner with my godmum and her group of 40+ family and friends (with the exception of last year when my family and I went to London together). I am not much of a cook, but I am great at decorating and my area of expertise is definitely in presentation.
This year was my first Thanksgiving at their newly renovated home. So naturally, I wanted to do something extra special with the table décor. That is when I looked to Pinterest for inspiration.
This year was my first Thanksgiving at their newly renovated home. So naturally, I wanted to do something extra special with the table décor. That is when I looked to Pinterest for inspiration.
After scrolling through hundreds of photos, I took this...
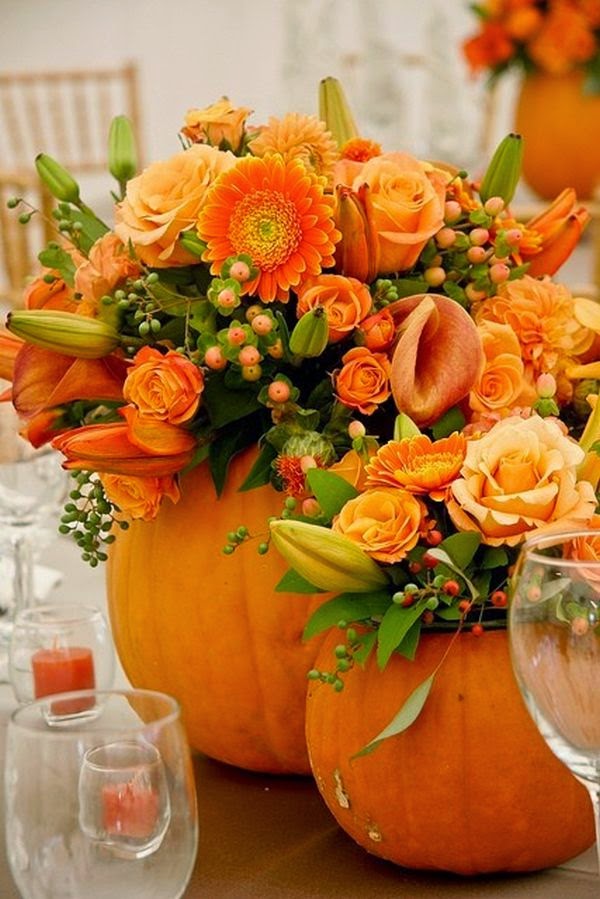
Plus this...
And made this:
Step I
Carving an opening wide enough to fit a glass cylindrical vase inside.
Afraid of knives, I enlisted the help of my dad for this risky procedure.
Thanks, Daddy!

Step II
Gutting out the pumpkins, scraping it as bare and clean as we can.
Step III
Cutting the vine and leaf patterns out from the three printed sheets of paper and attaching it together as it should align on the pumpkin. Then taping the pattern onto each pumpkin and tracing the vine and leaf pattern by puncturing small holes along the design.
Step IV
Using a ¼" ceramic clay hole cutter to puncture holes on the pumpkin along the pattern.
Step V
Using a v-shaped linoleum cutter to meticulously flesh the designs onto the pumpkins.
I knew this was going to be hard work, but geeze louise, was it tedious and tiring!
Each pumpkin took about two hours to carve!

 |
| Photo credit: 20 Centerpiece Ideas For Fall Weddings |
Plus this...
 |
| Photo credit: Martha Stewart's Vine and Leaf Carved Pumpkin Centerpiece |
And made this:
 |
| Pretty good for first time, right?! |
Step I
Carving an opening wide enough to fit a glass cylindrical vase inside.
Afraid of knives, I enlisted the help of my dad for this risky procedure.
Thanks, Daddy!
Step II
Gutting out the pumpkins, scraping it as bare and clean as we can.
 |
| Spray roses were from 1800flowers.com, eucalyptus painted in purple and dipped in gold were from Safeway, and accent floral bunch were from the local farmer's market. |
Step III
Cutting the vine and leaf patterns out from the three printed sheets of paper and attaching it together as it should align on the pumpkin. Then taping the pattern onto each pumpkin and tracing the vine and leaf pattern by puncturing small holes along the design.
Step IV
Using a ¼" ceramic clay hole cutter to puncture holes on the pumpkin along the pattern.
Step V
Using a v-shaped linoleum cutter to meticulously flesh the designs onto the pumpkins.
I knew this was going to be hard work, but geeze louise, was it tedious and tiring!
Each pumpkin took about two hours to carve!
I could have done this during the week to save time, but since I knew I was not going to preserve the pumpkins in any way, I needed them as fresh as possible so I did it the night before. After arranging the bouquets in each pumpkin centerpiece, I didn't sleep until 3:00 am! The results were worth it though, in my opinion!


Dinner was at 6:30 pm and I was done setting up all four tables by 3:30 pm.
Feels good to be ahead of schedule!

For dinner we had turkey, prime rib, ham, baked yam, Brussels sprouts with walnuts,
green beans with almond and cranberries, sweet potatoes with marshmallows,
stuffing, and a mixed veggie platter with a creamy lemon dill dipping sauce.
For dessert we had apple and pumpkin pies, and as always, my godmum's wholesome pumpkin cake. (Obviously, the center island could not fit all the food we had.)

 |
| All the placecards were designed by yours truly! |
And we ended the night playing the infamous "party game for horrible people."
 |
| Great minds think alike! ☺ Thanks for taking the photo, Karen! |
No comments:
Post a Comment